

mechDOG for Beginners, Advanced Users & Developers!

- mechDOG
- Control Options
- How to use the API?
- How to create Special Moves?
- How to Customize?
- How to add Sensors?
What is mechDOG?
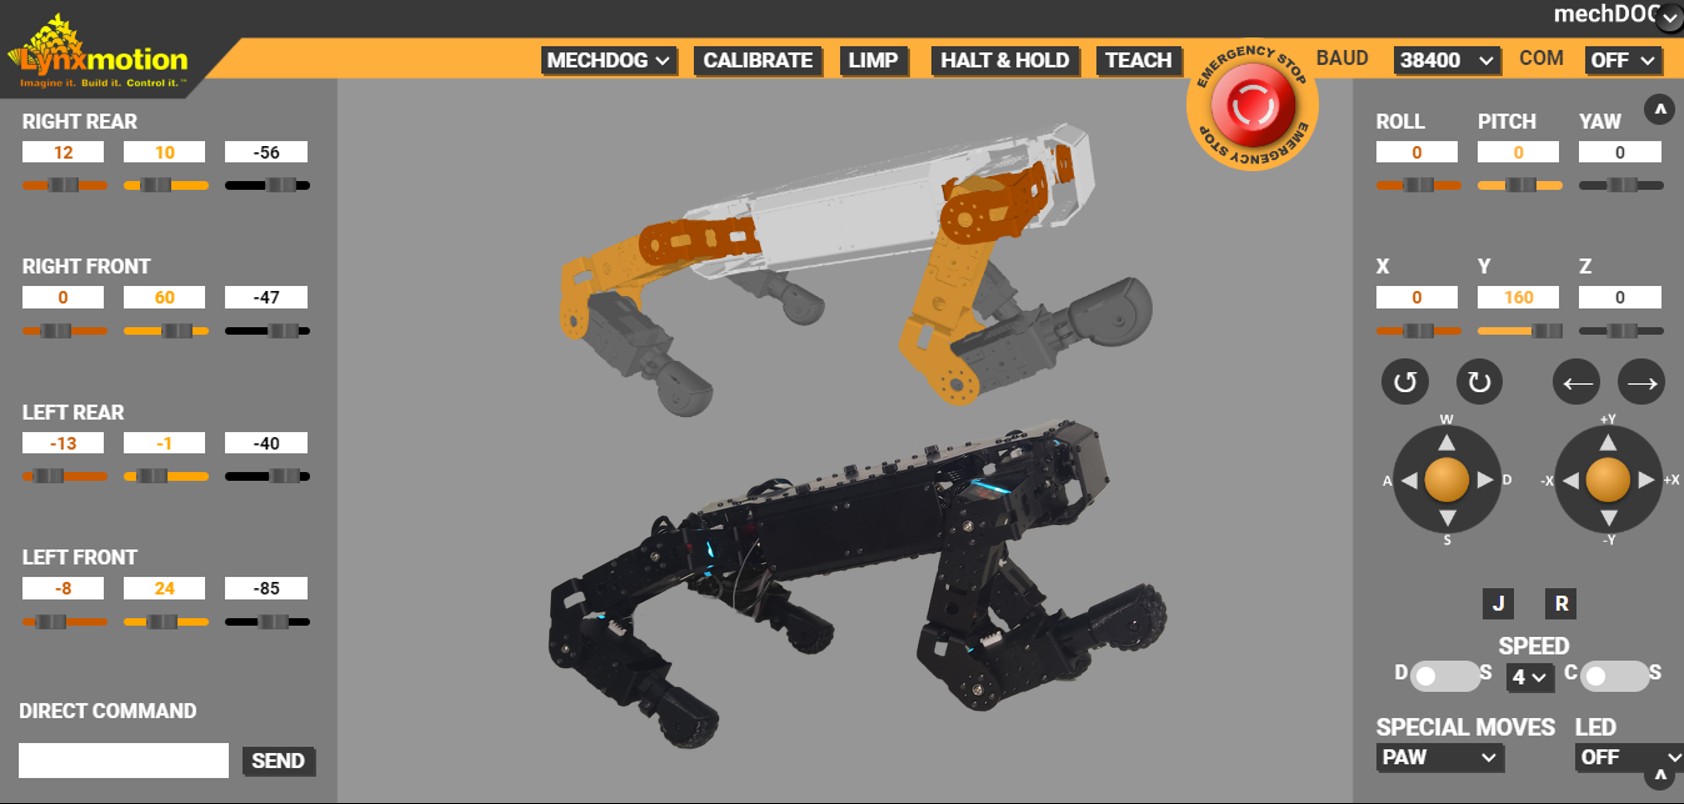
mechDOG is a dog-like quadruped robot that features the Lynxmotion’s Smart Servo (LSS) Motors and the Servo Erector Set (SES) V2 brackets for the frame. It can be controlled in various ways including remotely with a handheld radio controller, wired with a USB cable, via WiFi using the interface available for PC and web or even directly using the API.
Expandability
The robot uses an Arduino microcontroller to handle motion control, calculate the inverse kinematics and generate the gaits, receiving commands from the different control options available as well as sending commands to the servo controller. It also allows for expansion by adding extra microcontrollers like an ESP32 or a single board computer like the Raspberry Pi which can be used as the controller for peripherals like sensors (LiDAR for example) and for high-level decision-making.
Flexible motion
The inverse kinematics code allows to move the robot in many different ways and the best part is that these motions can be combined. For example, you might want to make the robot walk forward but perhaps you would like to adjust its height to avoid obstacles, or maybe add a bit of body roll, or a frontal offset. This is all possible all to the flexible kinematics of mechDOG. You can also make it walk to a specific angle rather than just forward, backward, left, or right, as well as make it rotate or jog/trot.
For beginners: How to adjust the sample code to use the different control options?
The sample code includes a configuration file that defines the option that is going to be used to control the robot, the possible options are:
- UNDEFINED: to control the robot using the API
- C_RC: to control the robot remotely using a Radio Controller that supports PPM.
- C_WIFI: to control the robot wirelessly using a WiFi bee which is a Serial-to-WiFi module compatible with the Xbee footprint.
Depending on which option is defined, the configurations needed for each control option will be included in the main sketch. If you choose any of the remote options you will also have to modify some parameters in the walking_gaits.ino file to ensure everything runs smoothly.
For RC mode, you will want to check which analog pin is being used to read the PPM signal, the default pin is A0 but can be switched to any pin that supports interrupts, there is also the option to invert the channels if the user wants to but this is disabled by default.
For WIFI mode, it is necessary to add your WiFi SSID and password and check the pins used for the serial communication between the WiFi module and the motion controller as well as the baud rate which should match the one configured in the WIFI module.
There is also a function that allows you to configure a WIFIbee module in case you haven’t already done it. To use it simply un-comment the function xbeeConfig and if you’d also like to know the IP assigned un-comment showSerial and connect the motion controller to a computer where you can check this information by using a serial terminal.

For beginners: How to use the API?
mechDOG can not only be controlled by WIFI, RC, or USB but it can also be controlled using the API, which allows you to move the robot using simple commands:
- walk(angle): Makes the robot walk; it takes as a parameter the walking angle in degrees. The walking angle is defined like this:

Where walk(0) stops the robot's motion.
- rotate(direction): Makes the robot rotate; it takes as a parameter the direction which can be -1 (CCW), 1 (CW), and 0 (StopRotation).
The walking motion can also be adjusted by changing the speed and the trajectory.
- setSpeed(speed): Changes the speed for the walking motion it takes as a parameter the speed value which ranges from 1 to 4, where 1-3 corresponds to the static gait and 4 to the dynamic gait.
In the static gait, the robot moves one leg at a time (slow but stable), and in dynamic mode, it moves pairs of legs (faster but less stable).


- gaitType(type): Changes the gait type/shape, which can be 0 (Circular) which is the default or 1 (Square).
- height(heightVal): Changes the body’s height; it takes as parameter the height in millimeters, the valid values range from 60 to 160 mm.
- frontalOffset(xOffset): Makes the center of mass of the body move in the X axis; it takes as a parameter the offset in millimeters and ranges from -45 to 45. Where positive values move it to the front.
- lateralOffset(yOffset): Makes the center of mass of the body move in the X axis; it takes as a parameter the offset in millimeters and ranges from -30 to 30. Where positive values move it to the left.
- roll(rollVal): Makes the body roll; it takes as a parameter the roll value in degrees and ranges from -20 to 20. Where positive values make it roll to the right side.
- pitch(pitchVal): Makes the body pitch, where the pitch value is in degrees and ranges from -20 to 20. Positive values make the front of the robot go up.
- yaw(yawVal): Makes the body yaw, where the yaw value is in degrees and ranges from -20 to 20. Positive values make it move clockwise.
- speciaMove(move): Triggers a predefined sequence defined as a “special move”, the possible options are:
- UP: The robot stands up
- SIT: The robot sits
- LAY: The robot lays down
- PAW: The robot gives a paw, this can be triggered either in UP or SIT
- WIGGLE: The robot will wag its “tail”
- TINKLE: The robot will make a peeing motion
- STRETCH: The robot will stretch
- JOG_ON: The robot starts trotting, this can be triggered in Static or Dynamic gait
- JOG_OFF: The robot stops trotting


You can find an example of how to use these commands in the walking_gaits sample code in the sampleMoveSequence function which goes through different stages, and every 4 seconds triggers a different motion.
For advanced users: How to create custom "special moves"?
A great option for making the robot feel more unique is making custom sequences or “special moves”. This can be done using the API by adding a new move with its predefined sequence specifying the “actions” the robot will perform during the custom move, for example, you might want to add a sequence for dancing, following a trajectory, or anything else you imagine.
A nice tip for creating a new “special move” is using the interface to simulate the positions of the body. You can change the Roll, Pitch, and Yaw values as well as the offsets in the X, Y, and Z axis, or even change specific joint values. This way you can test different positions and not risk moving a joint beyond the safe range. Once you have all the positions figured out, write down the steps for the complete sequence to create a new custom move and add it to the specialMoves function in the IK_quad module.
For developers: How to customize?
There are different ways to customize mechDOG, one of these options is adjusting the sample code to your needs, another option is to use a different “brain” for mechDOG which can be easily achieved as long as you are able to send “motion commands” through serial to the motion controller which is an Arduino compatible microcontroller (Arduino UNO, Lynxmotion LSS-2IO, Lynxmotion BotBoarduino, etc).
If you would like to customize the code for inverse kinematics you should check the IK_quad module which calculates the joint's positions for the robot’s actions as well as the synchronization of the legs for walking motions. If you would like to add new motion commands or perhaps adjust the available ones to perform certain actions you should check the LSS_MCU module which describes the communication protocol for the motion controller unit and takes care of the serial communication between modules. The Quadruped module integrates the other modules with the LSS servo communication and other useful functions to handle how the robot is being controlled (RC or WiFi), and also defines a straight-forward way of controlling the robot using simple commands like walk, rotate, etc (API).
For developers: How to add sensors?
There are multiple ways of adding sensors to mechDOG, a simple option is adding the sensor to the motion controller which is an Arduino-compatible microcontroller, however, keep in mind that the Inverse Kinematics code runs on this board so you might find that this is not possible because it might have a limited processing capacity. If this is the case you could add an extra microcontroller or single board computer to handle the sensors.
Some great options for the microcontroller are an Arduino Uno or an ESP32 (if you would like some wireless capabilities). If you prefer programming in Python a nice option would be a Raspberry Pi Pico, or if you need more resources for the tasks you are planning (for example adding a camera and recognizing objects, or perhaps working with navigation) a Raspberry Pi would work well.
Regarding the possible sensors to add to the platform, the sky is the limit! Some popular options are:
- Distance sensors: (ultrasonic, infrared, or laser) are often used to avoid obstacles.
- Contact switch: could help prevent collisions.
- Pressure sensor: can be used on the paws to sense the ground and could potentially be used to allow the robot to walk on non-uniform terrain.
- IMU: an inertial measurement unit combines an accelerometer with a gyroscope allowing to sense the robot’s orientation which could be used for balancing.
- Camera module: Allows the robot to see its environment.
- Localization system: This can be either by using indoor beacons or using a GPS for outdoor localization.
- Miscellaneous sensors: Light, sound, thermal, or even gas sensors can be added for extra functionalities.
Regardless of how you decide to use or modify mechDOG, I assure you that it will be fun and you will learn new things along the way. And if you have any questions or want to contribute to the conversation write in the comments section below!
Thanks for helping to keep our community civil!
This post is an advertisement, or vandalism. It is not useful or relevant to the current topic.
You flagged this as spam. Undo flag.Flag Post