


MDi #4
UPDATE @ April 2, 2018
Hello LMR!
Another looong time since last update. This robot stayed about a year abandoned in my lab getting dusty. But fortunately I got the time to work on my projects again.
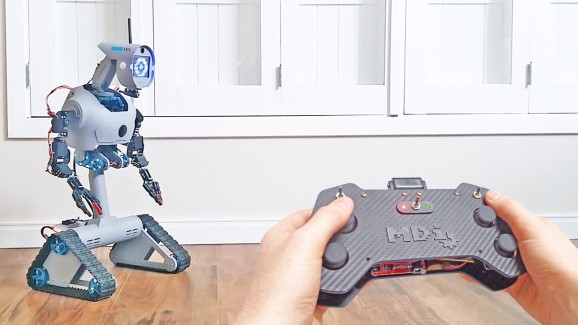
So in this update I show some "old" video/pictures material (recorded more than a year ago) about making the head. But also a new video made in the last weekend, of MDi #4's remote controlled method.
Note on the video about the remote controlled method that the simply aesthetic antenna in the head was changed by a functional one (NRF24L01 module).
I still have video material to edit (about making the remote controller). And some sensors in the head are waiting for the programming that they deserves. But this project is closer than ever to the "complete" status. Well, my robots never get complete. :)


UPDATE @ October 16, 2016
Hello guys!
Long time since the last post... I have a lot of pictures and video takes, but I do not have much time to organize everything and post... but today got some...
Well, this time, more videos than pictures. Actually five new videos.
So, here's a description of what each video shows.
DIY remote controller with NRF24L01 and Arduino (servo control - test #1)
Short video that shows a custom remote controller I made especially for MDi #4, but it can be used to control other projects.
I had issues to find a PlayStation 2 controller that worked properly... and after two tries that completely failed (joypads that just don't interface with Arduino) and a last try with one that worked partially (but ended up with its receptor fried, accidentally), I ended up deciding to make my own custom controller, based on NRF24L01 modules.
Making the robot MDi #4 - part 4: chassis
Actually the chassis was finished about four months ago, and I have already shared many pictures about its construction, but here's a video that shows a bit more details about the making process.
Working with high impact polystyrene (cutting and drilling)
It's also part of the above video, but shows a little slower how I cut the high impact polystyrene sheets with utility knife.
Makeblock Robot Gripper test @ 11.1V & MDi #4 arms test
Testing the arms mechanism and its lifting capability. Note that it can lift a small Coke (250ml).
Robot face with Makeblock Me LED Matrix (MDi #4 head preview)
This guy will have only one BIG EYE. Changed the 8X8 LED matrices with red dots (that was the initial plan... would be four matrices, forming a 16X16 matrix) by matrices from Makeblock (two 8X16 matrices) which has blue LEDs, and I guess it looks much better, with its blue color conforming with the other parts from Makeblock.
UPDATE @ July 29, 2016
Hello guys!
It's winter time here (Brazil) and I'm in holidays (actually it's almost in the end now... the holidays), so I intensified the work in this project.
I finished the brackets for the "neck" (pan/tilt system for the head).
Also arrived the last parts to finish the robot (parts provided by Makeblock). So I finished the assembly of the tracks and arms... and I'm on the way to finish the head (actually at this moment making some designs... but the inner parts to hold the neck and the neck itself are ready).
Started some tests with Pixy (which I won from a "Call for Reviewers" here at LMR), using the head from the initial cardboard prototype.

I'm in doubt in some aspects for the head: how to join all components without making it too big. Pixy, another camera for FPV, two Makeblock Me LED matrices (for eyes/facial expressions) and an ultrasonic sensor. I'm thinking about start with a simple one (head) and later improving it. Of course each model will take more and longer working hours.
UPDATE @ June 18, 2016 - Chassis almost done; some additional details; and general progress overview
Hello guys! Long time since the last update...
The last three months were mainly dedicated to craft the chassis. You will see that its design changed a bit, compared to the initial cardboard prototype. Actually I think it looks much better now.
So, today I'll show you 40 new pictures of the crafting process. I was anxious to share it. I hope you enjoy! ;)
Johnny Five is always in my mind. So, this time he has influenced me in the design of the chassis. The main part/material of the chassis is a PVC pipe (diameter 75 mm).


To join the chest to the chassis, I used a 50 mm diameter PVC pipe to form a structure support. A PVC T-joint was used to help on making a perfect right angle.


The PVC parts were joined with instant adhesive. Screw and nut at the bottom, for reinforcement, and also epoxy.

Additional reinforcement and aesthetic detail.


Making some air inlets, where the DC motors will be placed.


These parts are for the end of the 75 mm PVC pipe and serve to hold the side brackets for the tank threads.


The base of the chassis is formed by five layers of 2 mm thick polystyrene sheet, reinforced with aluminum channels. This part will accommodate the battery and the driver for DC motors.


Bracket for the pan/tilt mechanism/chest.


The chassis also have an upper part, where are placed the power switch, the fan for DC motors driver and a display for voltage monitoring of the battery.


The robot is quite stable. But to prevent it from falling back, I made a custom caster wheel. (Sorry for the lack of pictures on this; you can see it better in the latest video.)

The laterals (brackets for the tank threads and DC motors) are also formed by five layers of 2 mm thick polystyrene sheet, and also reinforced with aluminum channels.


Still have many details to finish. Also in the chest (what are new on this are the air inlets).


I would like to thank very much again to Makeblock, for the new parts kindly provided for this project, like the tracks and more pulleys and some additional hardware, and other parts which I'll show while I'll add to the project.

That's all for now. Still have a hundred of small details to finish. The sanding work (to make smooth parts) is what takes more time.
Take also a look in the two new videos added.
See you!
THIRD PART @ March 6, 2016
Hello guys! Just a short update...
I've shown this part earlier... but now it's ready!
Although being small, it is very important... as it gives 2 DOF to the chest and joins the chest to the base.


Below you can see all the Makeblock parts used in this step of the project.

- 1X D Shaft 4x56mm;
- 2X Timing Belt 112MXL - 140T;
- 8X Plastic Rivet R4120;
- 2X Socket Cap Screw M4x16 - Button Head;
- 14X Socket Cap Screw M4x14 - Button Head;
- 6X Socket Cap Screw M4x8 - Button Head;
- 2X Headless Screw M3x5;
- 3X MG995 Servo Hub;
- 1X Shaft Connector 4mm;
- 4X Timing Pulley Slice 90T-B;
- 2X Timing Pulley 90T;
- 1X Gear 48T;
- 1X Bracket U1;
- 3X Plane Bearing Turntable D34x24mm;
- 2X Timing Pulley 62T;
- 4X Timing Pulley Slice 62T-B;
- 1X Gear 16T.

I'm a bit in doubt about the field of the "pan" movement... with the gear reduction it's limited to about 90 degrees. I have to see it in action to decide. If I want a larger field, I have to remove the limitation of the servo motor and exteriorise its potentiometer. Well, let's see...
SECOND PART @ February 27, 2016
I would like to have finished the chest, but he suffered a small accident... yes, he fell to the ground when I was preparing it to apply spray primer... but it's repaired and fine now!
I have uploaded a video of the Pepakura work and another that shows many steps of the fiberglass work.
Now the chest is closer than ever to be ready. And it's super lightweight. I just need to finish some custom features that will be made with polystyrene (high impact polystyrene) sheets. When it is fully ready, I'll weigh it.


Below you can see that I used polystyrene sheets in some flat areas. Certainly with fiberglass I could not do it so flat. And on the side became with a suitable reinforcement, where the arms are installed (3 layers of 2mm polystyrene).


I was a bit concerned about the DC motors for the treads, but fortunately I found good ones with 25 kgf-cm and 233 RPM @ 12V at a reasonable price.
I do intend to finish in the next days the pan/tilt mechanism.
See you guys!
FIRST PART @ January 27, 2016
Hello guys!
I'm starting the big project for this year: MDi #4.

It will be a tracked robot with chest and two functional arms.
Will have a head for express some info about its interactions with the environment.
I'll be sharing all the making process of this project, so I'll make many videos detailing the crafting of every part.
To start, I have a video with some initial specs of MDi #4.
I have already started to work in the chest and its tilt mechanism.
So here's also a preview video of these parts, which will be detailed in the next episodes.
I'm very glad to say that Makeblock have sponsored many parts for this project. I expect to make a cool and strong robot with these parts.
Stay tuned!
---------------
MDi #4: Mech-Dickel interactive number 4.
I started this project in 2015 (october/november), wanting to make a medium-sized robot. Functionally will be very similar to my previous robots (not so much smart/A.I.), but I hope to have much more fun with this one.
Just like the previous projects, MDi #4 will be remote controlled and also will have some simple autonomous routines. What sets this project is its size (will be about 80 - 85 cm tall, with the head).
Its brain will be an Arduino Mega 2560, receiving inputs from sensors and remote controller, and controlling the servos and DC motors (these last ones with an additional H-bridge).
Another difference is that it will have a FPV system.
This project is having a sponsorship with parts from Makeblock.
Although it's a medium-sized project, the challenge is BIG, to make a functional and strong robot and to give it a friendly look.
Notes: The latest update is in the top. Only the last three videos will be embedded; the early videos are listed in a section in the bottom of the project page.
Early stages' videos
https://www.youtube.com/watch?v=ehLnRWpbESU - Makeblock Robot Gripper test @ 11.1V & MDi #4 arms test
https://www.youtube.com/watch?v=kazFqNyp7IA - Robot face with Makeblock Me LED Matrix (MDi #4 head preview)
https://www.youtube.com/watch?v=1fc-W96M07U - MDi #4 head preview & Pixy CMUcam5 Image Sensor pan/tilt demo
https://www.youtube.com/watch?v=bV-pv0VVfcE - Winter holidays and new Makeblock parts
https://www.youtube.com/watch?v=Sn20PAz0qz4 - Overview of the crafting progress (MDi #4 is becoming alive)
https://www.youtube.com/watch?v=rbXTIkzKdO8 - MDi #4 is becoming alive (first test of the tracks set)
https://www.youtube.com/watch?v=-CQgCTlfgBc - Making the robot MDi #4 - part 3: pan/tilt mechanism of the chest
https://www.youtube.com/watch?v=Pd-DyaBRZSo - Making the robot MDi #4 - part 2: fiberglass chest, arms preview and new parts received
https://www.youtube.com/watch?v=GnScQAgPAdc - Time-lapse: assembling a Pepakura chest of a Space Marine armor
https://www.youtube.com/watch?v=U6eUKA-n8-A - Making the robot MDi #4 - part 1: cardboard prototype, Makeblock parts and initial specs
https://www.youtube.com/watch?v=_Tzq_Ee5A2U - Chest tilt mechanism with Makeblock parts - MDi #4 is coming...
Additional info, links and references
http://mech-dickel.blogspot.com/ - Mech-Dickel: DIY Robotics - My blog, with basically the same info posted here. (outdated)
http://labdegaragem.com/forum/topics/construindo-o-rob-mdi-4 - Construindo o robô MDi #4 - Laboratório de Garagem [...] - The same, but in portuguese. (outdated)