


Re-building My little robot "Mark 3"
After 3 builds, the reality hit me that, I’m guy with a wife and 2 kids and don’t have a massive amount of free time, nor can I cut, saw in a straight line lol. So I’ve now gone with what I think will work allot better that my previous attempts.Mark one only had rear steering, so if not on an even surface would cause issues, thought best to go down the line of a chain system, but I couldn’t get 6 wheeled system out of my head. So Mark 2 was built, it worked well, but chassis badly needed to be rethought as it was bending slightly and my chain system wasn’t working as well as I wanted, among a few other issues, My wonderful wife pointed out I was spending a little too much time on it. So had a little rethink, one that would just work.
Mark 3 was born and has been reinforced really well. Motors are now underneath and bolted to a steel frame inside the box, have started to build some rubber to cover them, with a sump guard to go over and bolt to the frame (used the bottom of my mark 1)
Resprayed the wheels, have bought some chequered trims and sprayed them, inside has been glued with rubber matting and all the way around the outside. Trims have been stuck to the sides. Running 2 car battery’s (Second hand, x2 for £30 ?)
Access point, Rasppberry pi, Motor controller and 12v-5v converter, have been installed back onto the (White) metal plate from Mark 2 with rubber underneath.
Running with the car batteries, the current is allot better and so its slightly faster, only issue I am now left with, steering ! skid steering just doesn’t like concrete, only gravel or grass etc. need to think about converting the front to steer left and right ☹


Lots of other wonderful things to do on this, add my front lights, install my wooden parts to re-inforce the rest of the frame, oh and replace my motor controller, the metal heatsnyc plate came off while out driving her around, the chips got to hot and burnt out. lesson learnt for next time. bolt it down lol.
Only picture I have taken so far is the start of my second day, will upload some more.
This feels like a curse I just cant kick lol
**********************Update*******************
Well it’s been well over a year since I’ve done any work on this bot. The awesome part its, I’ve moved to a new house and now have a garage, which has been carpeted and generally geeked out.
When I used it last year, was having major issues with skid steering, tried a few setups with my Sabretooth, but just wasn’t playing ball.
Just before I was locking it up for the winter, my heat sync fell off my sabretooth 10 minutes later, all the chips fried ☹
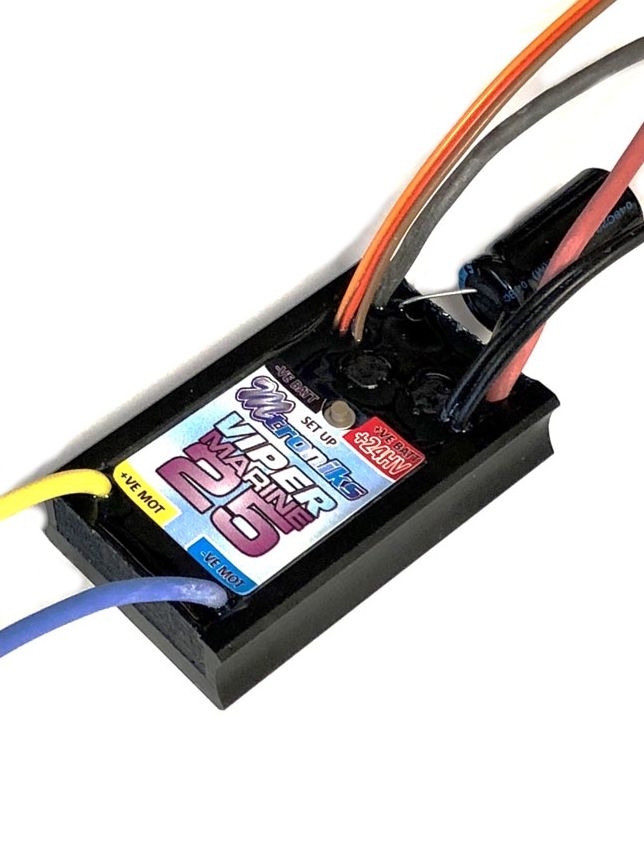
Left it over the winter to rethink. Bought 2 Mtroniks 24v esc (with reverse)
My Cheerson CX20 radio gear decided to give up on me. So bought myself a flysky i6.
Hooked it all up and to my surprise, skid steering was working perfect. Was very pleased as was about to scrap and re-design.
Jumped on it with my son and rode it to the park, were he carried out his testing for me lol.

Next steps are to reinforce the insides, tidy up and rise the wiring system , think about what I what to use the other 4 channels for on my radio gear, build a bumper, fix the lights to the bumper, finish wiring my x2 emergency stops.

Then, using the same rubber that i used to cover my bot, finish x4 covers for the motors. Once done, will add my metal panel underneath, which essentially will be a sump guard.

Will added some sort of decals and try and make it look the bees nees.
I've made a bumper which looks ok i guess, was hoping for something better looking, But hey ok for now.
Next job, is to use some more rubber to make covers for the back ends of the motors, then add my metal plate underneth

Updating as to what this bot has been doing since my last update.
Not looking to great at this point was pretty pleased at the time.

Have my number one tester, making sure its doing what its meant to be.

The bumper was from a 4X4 license plate holder, did look ok, but didnt stand to well when driving through bushes etc lol.
Now with this Covid19 hitting us all, myself, wife and kids are all at home, safe and sound, heading out to the park and woods and keeping clear of everyone.
Being at home for the past 6 weeks has giving me the time to almost finish what i envisioned all thought years ago.


Really pleased with my progress, just a few gripes, the ground clearance isnt enough, need slightly larger wheels, am currently trying to fix some mini quadbike wheels to it, but just can match up the hub in the center.
Gave myself a bit of a telling off, had these Mini Moto wheels sat in my garage for a few years, thinking it would be a nightmare drilling new holes and trying to line them up to my wheelchair hubs. Told myself you have the time your not at work (Covid19 lockdown) get on it !!!! Took me a few hours and boom, they fit !
Nothing can stop it except a tree lol. little faster as well.
Really pleased.


***********************************************UPDATED*********************************************************
After finishing the new #Battlebots season, i was taking a long hard look at my robot, the metal plate underneath was made up of a metal worktop surface and the back off a portable gas heater. Thought it was time to update it and try and make it look a little nicer and try matching something closer to my favorite T.V show.
So i completely took her all to bits again, ordered a nice peace of sheet metal, sprayed it orange, then covered it with sticky back plastic. Removed the soild metal frame i had installed inside the robot and place it underneath, sprayed that black. Then built a wood frame to sit between the box and the metal sheet, for when it hits something large underneath like a rock, as i didn't want it to fold in.
I rebuilt the front end with some inspiration from the #Clearpath robot, maked a box area for the back, this now houses the WiFi.
The Wifi is for live video feed and to connect to my laptop that will be using an Xbox360 Kinect to scan environments in 3d.
I have loads more to do, removed the white animal sticker and replace it with an orange one, stick the teeth to the front, plus other geeky stuff


So i can ever see me ever stopping with this project, always fixing something to my Robot or adding more stuff for the kids.
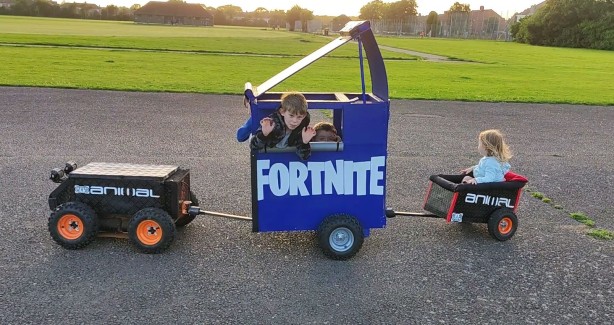
I built a trailer for my kids.
 Then after school my kids friends all want a go, could just about manage 2 people. So hell with it i built another trailer so that i could carry some more kids.
So my small trailer that i built, now has smaller wheels so that i can add them to the Blue trailer, which has a Linear Actuator that open and closes the door.
Robot is now running two 70 AH AGM Batteries , that last quiet some time, way better than using car Batteries
