


Penny
Hello LMR, this is Penny the 3 servo hexapod. Penny is not just a very cheap way to build a hexapod but a very cheap way to build a robot, period. I actually based this robot off of a bot named Stomper that I had found here earlier on LMR.
DESIGN:
I really liked how the mechanics of Stomper worked and seemed like a fairly simple design, so I fired up SketchUp and started designing parts. After a while I had something that I thought would work and it was off to the printer. All the parts for penny are in the .zip file at the top of this post. I've included the SketchUp source files as well as the .stl files that can be sent directly to a 3D printer. If you want to modify any of the pieces, I recommend changing the SketchUp files and then building new .stl files from there.
CONSTRUCTION:
The goal of this project was to make a robot that could be built for a very small amount of money and still be "worth building". The total cost of this whole project was just under $10 USD. If you were to buy all the parts separately (Special THANKS! to DFRobot who sent me the CheapDuino as a contest winner) it would still be under $15 USD. All the parts took about 3 hours to print and when they were done it was just a matter of a few minutes to run a drill bit through the holes to make sure all the pieces were smooth.
ELECTRONICS:
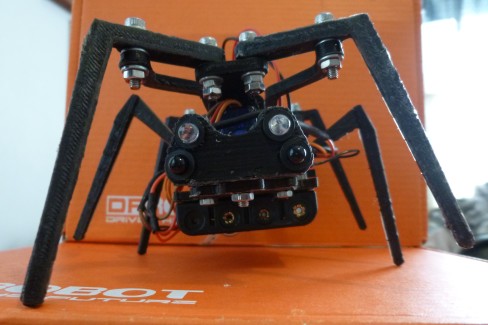
The CheapDuino is a great board if you don't have a lot of space and want to keep your project as small as possible. As you can see by the pic, the entire board is about the size of my thumbnail. The ATMega8 has plenty of power for this robot and the (4) AAA NiMH batteries powered it directly quite well. The board doesn't have a voltage regulator, so you have to be careful with the power supply that you feed it. The 4 NiMH batteries that I'm using are just slightly above 5v when fully charged and have a total capacity of 850 mAh. Although it only has 6 pins broken out (3 digital PWM, and 3 analog, it is still quite useful for a handful of projects, including small robots like this, for the same price as a raw AVR microcontroller without any of its support hardware (PCB, crystal, caps, resistors, ect...).
Without any mounting holes, I found it easiest to make a sort of undershield that the board could connect to for the sensor and servo hookups that were needed.To make the undershield board, I needed to keep everything as low as possible so the the center legs would have enough clearance. I put the servo header on one side (on the left side in the picture to the left.) and the IR sensor header on the other. I also added a small 2 pin header for connecting the battery to the SPST slide switch. To minimize wires on the bot, I clipped the servo wires to the length I needed and put all the signal wires to a single 3-pin connector, then I tied all the grounds together, and all the power leads together and ran those to a 2-pin connector. So basically I have all three servos wired to a 5 pin connector which plugs into the main board. The right side has the connections for powering the IR LEDs, triggering the transistors that help light them, and 2 pins for reading the data from the left and right "eyes". The white connector on the top of the CheapDuino is for connecting a 10-pin 0.5mm pitch FFC (Flexible Flat Cable), which is like a micro ribbon cable, to a small breakout board that was included for programming. 5 boards, 2 cables, and the programming breakout board for programming cost about $20 USD, so it is really the cheapest Arduino you can buy right now. I used a MEGA1280 with the ISP sketch loaded to program it, and for some reason I had to burn the bootloader first each time I uploaded a new sketch. This might be the version or Arduino I'm using or something similar as I've not heard of any on else having this issue. Aside from that it worked great.
The bottom didn't turn out as well as it could have, but it works and there are no shorts. The hardest part was trying to find room for everything. I did end up putting a few resistors and a transistor directly in the head to save a little room on the perf board. If I did it over, I'd probably just try to get it all to fit, as I'm not sure how long it will be before a lead snaps off one of the components from not being mounted "properly". Knowing my luck, it is bound to happen.
Here is the schematic for the IR LED and the corresponding sensors. I took OddBots' lead with one of his IR circuits and adapted it for my own use. The circuits are quite similar besides some differences in the resistor values. I had some IR LEDs that could take 100mA continuous or 200mA peak, so I opted to drive them with more current. I made the schematic with Cadsoft's Eagle PCB Software and you can download it for free to make circuits and gerber files to have a PCB professionally made if you felt inclined to do so. It has a bit of a learning curve, but what doesn't, really? I didn't include the connections for the servos since they are pretty straight forward. For each servo I ran the signal wire to a digital pin, and powered them directly from the battery (after the power switch, of course). I didn't even add any caps and everything seems to work fine without them.... so far.
(click on image to enlarge)
CODE:
There is a link at the top of the page where you can download the Arduino Sketch that was used for Penny. Keep in mind the Cheapduino has only 6 pins, so the programming is very basic with lots of room for improvement. Although it was most likely unnecessary, I commented almost every line of code since LMR is growing rapidly and many of the new people are new to Arduino as well. If you are one of those people I will recommend you check out ChickenParmi's excellent Arduino Tutorials to get a better understanding of what everything means. I make no claims to being a programmer!
EXTRA PICS:
Putting the bot together was fairly simple since I had already built it once in SketchUp (see the attached .zip file at the top of the page for the file with the complete assembled robot as well), so I knew how everything should fit. Here are some pics of the finished bot as it ended up.
Thanks for checking this out. If you have any questions, comments or suggestions, please leave a message in the section below.
Avoids obstacles via IR
- Actuators / output devices: (3) 9g micro servos
- Control method: autonomous
- CPU: atMega8
- Operating system: Arduino
- Power source: (4) AAA NiMH rechargables
- Programming language: Arduino
- Sensors / input devices: Left and right IR sensors
- Target environment: indoors