


ROBOT PROJECT (WALL-E)
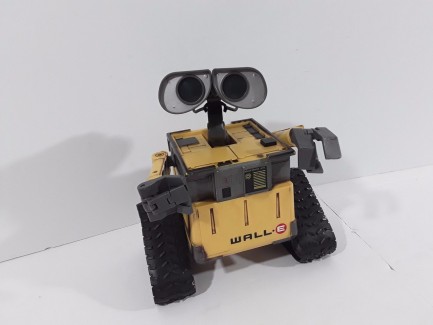
For sometime I have wanted to do a Wall-E robot and have seen on many other sites where people have done them. I found one recently that was missing the remote but in great shape. I have many ideas on the design for this bot and what components I want to use. I am kind of caught on that famous teeter totter on which way to go. On one side I want to use a LattePanda and then use all the Arduino sensors and still use a Webcam for facial recognition and motion detection etc... On the other side I want to do a complete Arduino system using a IR Distance sensor a RTC and a SD module for voice. Not sure which way this one will go. Looking for some input and suggestions to this one.
UPDATE: 11/9/17
Ok so I got the chance last night to do some work on Wall-E.
First of all I am going to record all the various sounds that he makes to be used later with an SD card and the Arduino.
Yes the decision to use the Arduino has been made after checking out the inside cavity and doing some measuring.
The is just not enough room for the LaddePanda and the battery and Servos.
There will just enough room for the Arduino Uno, DFRobot Motor Shield and a Sensor Sheild along with some servos.
I was quite certain that I was going to have to use two continuous rotation servos to drive the tracks.
What this version of Wall-E has is two independent 6v geared motors so I will be using the DFRobot Motor Shield the same type I used on my desktop bot.
After I remove the current board and other misc. materials that will not be needed I will have a grand total of 4.5" wide X 5" tall X 4.5" deep to work with. Not the most space but still enough for the project.
I plan on using the Ping sensor for distance detection and I am going to separate out the sensors and put one in each eye. I am also thinking of adding a RTC module and then setup a schedule so a a certain time he will stop and then just check for motion around him and if there is motion will alert.
If anyone has any ideas on anything would help I would love to hear them.
Some things I would like to do that maybe some of you have done or have ideas on.
* Return to charging station, not sure what to use here (GPS, Compass etc...)
I will post some interior pictures soon.
UPDATE: 11/11/17
I have to say after taking Wall-E apart he was one of the hardest most difficult toys I have ever taken apart. I thought taking a Robosapien V2 apart was difficult, Wall-E by far was much more difficult and was designed to be pretty much bullet proof. From the removing the tracks/rollers from the body to removing the arms it was a major pain in the hind end.
After getting Wall-E apart my first job at hand was to see if I would have room for my servos and the electronics that I wanted to use. I did some quick measuring and if done correctly I will have enough room for an Arduino Uno/Motor Driver Shield/Sensor Shield/Speaker/SD Card Reader/5 Full Size Servos MG-996 and the Batteries and will still have room left. Hard to believe but it can be done. The original drive train was a single motor with two gear boxes. As the motor goes clockwise both gear boxes turn the same direction. When the motor goes counter clockwise the gear boxes go opposite directions. This will just not work as we need to go left and right, Out with the gear boxes and the motor and a slew of other garbage that made it a toy. So to replace the gear box I am going to use two continuous rotation servos that will be mounted on the underside of Wall-E, this will save some space.
Onto more mass destruction and re-engineering. The person or persons that designed Wall-e and the gear boxes had to of been crazy or a genius. A total of two motors controlled everything. One for the gear boxes and the other one controlled his head left to right and his eyes moving and his arms going up and down.
First thing to get accomplished was the mounting of servos for the arms.
Here you can see pictures of the servos mounted into the top lid of Wall-E.

Here is a close up picture of how the arms are mounted to the servos.

Here is a picture of the top lid on the base.

Here is a picture of the inside of the base.

Until next time :)
UPDATE: 11/25/17
I have taken the head assembly/Eyes apart and reworked it to fit a ping sensor in each side of the head/eye.
What I mean by this is I removed the sensors from the ping sensor board and then split them up installing one in each eye.
Lots needed to be modified to accomplish.
First the bracket that holds the lens for eye in place had to be modified.
The image below shows the before and after of the modification.

After getting the Sensors into each eye I then assembled the head and neck back together.
You can see the indivdual mounted sensor on each side of the eyes.

Next onto mounting the next back into the top section and then designing a bracket the hold a servo.
Here you can see the servo horn mounted to the neck bracket.
The gray round piece you see there is an original piece to the Wall-E, it had to be cut down alot to make it work and keep the neck from slipping through the hole.

Next was the fabrication of the servo bracket that will secure the servo in place keeping it from moving.

Now that we have the bracket in place it was time to mount the servo and test.

I tested out the rotation of the head/neck using the servo and all works perfect.
Here you can see the head/neck assembled back onto the top section and placed into the main cavity.

The next update will be dealing with mounting the servos for the tracks.
Until Then...
UPDATE: 11/26/17
So mounting continuous is not that easy and there is a large amount of the original chasis that has to be cut away to fit them.
Here is a picture from the bottom side.

A closeup of one of the servos.

Here is a view from the top through the main body/cavity.

Here is a view from the rear.

Next is the mounting of the Arduino and I have a clever idea for this one.
Until then!
The Arduino has been mounted and I have to say this idea was a great one to allow me to add more sensors onto the Arduino without having to take Wall-E apart.
Here is what was the battery compartment of Wall-E.

Now here is what is behind the battery door after custom designing some hinges from left over standoff I removed from wall-e.

Here is a close up picture of the hinge I designed from leftover standoffs I removed.

This great idea will make several thing so much easier in the future and I do not have to cut a hole in the side for a USB port.
Next is the wiring.
Until then!
UPDATE: 11/27/17
Just as I thought everything was going well a wrench is thrown into it all.
When I close the door with the UNO and the Shield all is great and it works perfect.
If I attach a servo cable to pins 7,8,9,10 or 11 it will not close.
The connector on the end of the servo cable is just long enough that it hits the servo for the head and the door will not close.
Idea, I will go back to using a Nano with a shield as it will work with a cable attached to any one of the pins and the door will close.
I now have to make my own breakout board for a separate power supply to the servos.
I have ordered som prototype circuit board and some screw terminals for the power.
This should fix the issue and Wall-E will be up and running soon.
Until Next Time!
UPDATE: 12/3/17
Some of the times your first idea is the best idea.
I orginally started out with the idea of using a Arduino Nano and that was great until I ran into needing a Sensor shield with a separate power supply for the servos. I could of made a break out board for this but really wanted everything to be factory.
I then decided to use a Arduino UNO with a sensor shield. I mounted it to the rear door and this would of worked except I did not account for the servo plugs/wires and they would hit against the servo that controls the neck/head and the door would not shut.
So back to the original idea and I designed a break out board for the 5 servos.
Below is a picture of the Nano and the Breakout board mounted and wired up.

Whats inside Wall-E.
Mounted on the inside left wall is a RTC,5w Amp and Power switch.
Mounted along side the neck servo is the Ultrasonic sensor board.
Mounted on the inside right wall is a 7.2 Lipo pack and a 3A UBEC.
Here you can see the mounting of the power switch.
I am using a DPDT switch to control the Arduino Power (9v battery) and the Servo Power.

I kept the original LED's in Wall-E's eyes.

The two screw that you see are for charging the Servo battery.

After doing some testing I found that the angle that Wall-E's head is positioned is at 12 degrees.
This throws the ping sensors off and the are not reliable at this angle.
I used a heat gun and lightly heated up the neck a small amount at a time evenly and I was then able to ben the neck so the head was level. The results from the Ultrasonic sensor and now more accurate and Wall-E is able to navigate obsticles.
After I get the obstacle avoidance where I want it I will then be adding an IR receiver so that Wall-E can locate the charging base.
I may also at the same time add a CDS photo cell so that when light levels are below a value LED's that I will be mounting in the front will come on.
I will post a video soon.
Until then!
UPDATE: 12/14/17
So I got the code working the way I like and Wall-E does a fantastic job of avoiding object and finding his way around the house.
My first test with the finished code I set Wall-E down on the floor in my Lab and before I knew it he had gone around the entire perimeter of the room and found the doorway and ventured out intot he hallway and then into the family room and then the dinning room. What an impressive first start for his first steps. So I decided to pull out the Video Camera and do a video to post or atleat I thought I was going to do this, Wall-E had a different idea. When I turned Wall-E on and started filming I noticed all of a sudden that the servo that controls the head movement (Pan) was not turning all the way to the right like it should. So I figured the batteries for the Servo's were oin need of a charge. I charged them and a hour later I tried again. Once again the same results, I was confused. So I took Wall-E apart to see if there was some loose connection, nothing wrong there all was good. I replaced the head servo and things seemed to be ok for a short period and then it started again. Then I noticed his eye going dim and he was running into everything and that is when I found the problem. The servos are running on a 2S lipo pack while the Arduino is running on a 9V battery. I replaced the 9V battery and Wall-e sprung back to life.
I recently ordered a 5v to 9v step up converter with charger so this will be installed along with another lipo that I can charge and then Wall-E will be in top shape for his video debut.
Until Then!
UPDATE 1/1/18
So I have been busy working on a new biped Max V2.
I took a break from the Biped to do some changes to Wall-E.
Here are the changes I made.
1) Rather than using the conventional method of addressing the Ultrasonic ping sensor I am not using the NewPing library.
2) I have added a set of headlights and a Photo cell to detect the light level and then turn on the headlights based on light level.
3) I have added a piezo element to play various sounds based on Wall-E's action.
When using the NewPing library you can not use the tone library, there is actually a library provided by the developer of NewPing that is called Tone No Timer that you will need to use.
A video is in the works along with some new pictures.
Until Then!
UPDATE: 1/10/18
Wall-E is nearly complete and just about ready for his video debut.
I ran into yet another obstacle and that is when going up an incline. If the incline is too great it would flip backwards.
Originally Wall-E had two small wheel on the underside that tried to prevent this. They were removed during the redisgn of wall-e to cyber wall-e. I have added them back but placed them on the rear of the unit on what I would call a bumper. So they function like a Wheelie Bar in a way. Still they are not enough to prevent this from happening. I have decided to add a couple tilt sensors. My idea is that I can se them up so that when the angle gets to be just before he would flip over they will engage and he will then stop and then go in reverse to prevent the flip.
Until Then!
UPDATE: 1/21/18
Wall-E now has a Compass module. WHY? Eventually I will have the software configured to self navigate back to a charging station. Knowing North,South,East,West and Heading will all be part of this.
Until Then!
UPDATE: 2/2/2018
VIDEO Added.