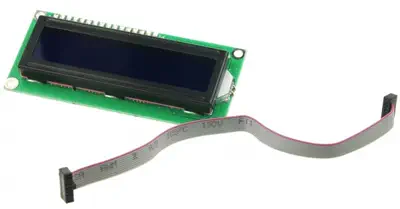
Módulo I2C / TWI LCD1602 DFRobot

Ahorre $1.61
DFRobotSKU:RB-Dfr-69
Número de fabricante: DFR0063

Precio  :
Precio de oferta $8.29 Precio regular $9.90

Envío calculado al finalizar la compra

Stock  :
En existencia, 4 unidades

Pagos y Seguridad

American Express Apple Pay Diners Club Discover Google Pay Mastercard PayPal Shop Pay Venmo Visa

Su Información de Pago se procesa de forma segura. No almacenamos los datos de la tarjeta de crédito ni tenemos acceso a la información de su tarjeta de crédito.

Descripción

  • Módulo I2C / TWI LCD1602 DFRobot
  • Gran pantalla LCD compatible con módulos Gadgeteer del fabricante
  • Voltaje de alimentación: 5V
  • Contraste ajustable
  • Interfaz: I2C / TWI x1, interfaz de Gadgeteer x2
  • LCD: 16x2

El Módulo I2C / TWI LCD1602 DFRobot es otra excelente pantalla LCD compatible con los módulos Gadgeteer del fabricante. Con pines limitados, su proyecto se quedará rápidamente sin recursos usando pantallas LCD normales. Con este módulo LCD de interfaz I2C, solo necesita 2 líneas (I2C) para visualizar la información. Si ya tiene dispositivos I2C en su proyecto, este módulo LCD realmente no le cuesta más recursos. La dirección se puede configurar desde 0 x 20-0 x 27. Fantástico para proyectos basados ​​en Arduino o gadgeteer.

Módulo I2C / TWI LCD1602 DFRobot- Haga clic para ampliar

  • Módulo I2C / TWI LCD1602 DFRobot
  • Tamaño: 82 x 35 x 18 mm
  • Dirección I2C: 0 x 27
  • Retroiluminado (azul con caracteres blancos)
  • Voltaje de alimentación: 5 V
  • Peso: 40 g

Customer Reviews

Based on 2 reviews
50%
(1)
50%
(1)
0%
(0)
0%
(0)
0%
(0)
R
Roger
Solid built board, but not well supported (yet)

Had issues locating a library that actually worked, could not get the standard libraries to work but I did eventually locate a library that does work and appears to perform well.

R
Ryan
excellent had not problems

worked with numerous libraries. just need to find the address when using with arduino. use i2c scanner code below for finding the address. // -------------------------------------- // i2c_scanner // // Version 1 // This program (or code that looks like it) // can be found in many places. // For example on the Arduino.cc forum. // The original author is not know. // Version 2, Juni 2012, Using Arduino 1.0.1 // Adapted to be as simple as possible by Arduino.cc user Krodal // Version 3, Feb 26 2013 // V3 by louarnold // Version 4, March 3, 2013, Using Arduino 1.0.3 // by Arduino.cc user Krodal. // Changes by louarnold removed. // Scanning addresses changed from 0...127 to 1...119, // according to the i2c scanner by Nick Gammon // http://www.gammon.com.au/forum/?id=10896 // Version 5, March 28, 2013 // As version 4, but address scans now to 127. // A sensor seems to use address 120. // Version 6, November 27, 2015. // Added waiting for the Leonardo serial communication. // // // This sketch tests the standard 7-bit addresses // Devices with higher bit address might not be seen properly. // #include void setup() { Wire.begin(); Serial.begin(9600); while (!Serial); // Leonardo: wait for serial monitor Serial.println("\nI2C Scanner"); } void loop() { byte error, address; int nDevices; Serial.println("Scanning..."); nDevices = 0; for(address = 1; address < 127; address++ ) { // The i2c_scanner uses the return value of // the Write.endTransmisstion to see if // a device did acknowledge to the address. Wire.beginTransmission(address); error = Wire.endTransmission(); if (error == 0) { Serial.print("I2C device found at address 0x"); if (address<16) Serial.print("0"); Serial.print(address,HEX); Serial.println(" !"); nDevices++; } else if (error==4) { Serial.print("Unknown error at address 0x"); if (address<16) Serial.print("0"); Serial.println(address,HEX); } } if (nDevices == 0) Serial.println("No I2C devices found\n"); else Serial.println("done\n"); delay(5000); // wait 5 seconds for next scan }

Estimar envío

También le puede interesar